Conditional and Unconditional Branches
What are the conditional and unconditional branches in PIC microcontroller ? Branching in the microcontroller is used for performing a task repeatedly. Repetition can be done either by checking a condition or without testing any condition. There are two major types of branching:
- Conditional Branching or Jumps
- Unconditional Jumps or branches
Conditional Branching or Jumps
In this case first a condition is tested. If that condition is true then the control is transferred otherwise control is not transferred. We will focus on PIC18F4550 for understanding this concept. There are different types of conditional jumps available in PIC. These are
DEFSC (decrement file register and skip if zero).
Its syntax is
DECFSZ FileReg, f
GOTO Back
This condition will decrement the count that you will set in a file register and then it will see either it is zero or not by reading the status of zero flag in status register. If it is not zero, then it will execute the next instruction that is goto back otherwise it will skip looping and will execute the next instruction.
Consider the following example.
Example
Write down a program for toggling the contents of PORTB 200 times.
COUNT EQU 0X08
ORG 00H
SETF TRISB
MOVLW D’200′
MOVWF COUNT
MOVLW 55
MOVWF PORTB
CMPF PORTB
BACK DECFSZ COUNT,F
GOTO BACK
In this code it can be seen clearly the counter is set at 200. The conditional transfer of control is done by using DECFZ.
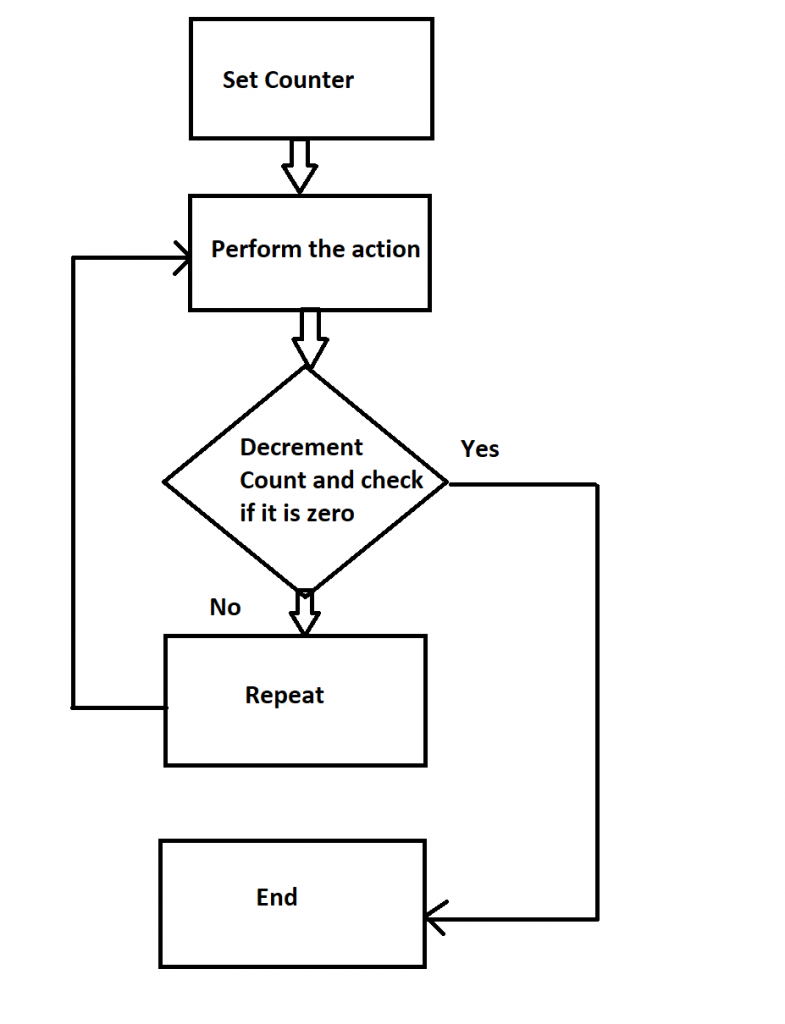
Flowchart of DEFSZ

What is the DECFSZ?
This instruction decrements 1 in the value of the file register COUNT and tests either it became zero or not. If it is not zero then it will execute the very next instruction and if it is zero, then the very next instruction is executed and hence looping is performed.
Other conditional jumps are:
- BZ (Branch zero)
- BNZ (Branch not zero)
- BC (Branch Carry)
- BNC (Branch not carry)
Unconditional Jumps
In unconditional jumps the control is transferred without checking the condition. Two most famous unconditional jumps are:
- GOTO and
- BRA (Branch) instruction.
GOTO instruction
GOTO instruction is a 4-byte instruction in which 12 bits are used for opcode and 20 bits are used for memory address. In this way 2M byte of the memory is accessible using GOTO instruction. It is possible only when the address bit A0 is fixed at 0. Hence even addressed memory slots are accessible. It calls in the category of long jump. When the size of the code is large then GOTO instruction is preferred.
GOTO itself using $ sign
If we just want to keep system busy in doing nothing then we can perform such action using the following GOTO instruction.
again GOTO again
It can also be done as:
GOTO $
According to this instruction, the loop will keep going like an infinite loop.
Example of GOTO instruction
Write a program for toggling the contents of PORTB infinitely.
CLRF TRISB,0
MOVLW 55H
MOVWF PORTB,F
AGAIN COMF PORTB,F
GOTO AGAIN
END
BRA instruction
This is again an unconditional jump and its size is only of 2-bytes. It means 4 bits have been reserved for the opcode and rest of the bits are used for addressing the memory. So in this way 2Kb of the memory is available while using the BRA instruction.
What is the advantage of using BRA over GOTO instruction?
Since BRA is only of 2 byte and GOTO is a 4 byte instruction. So BRA instruction can only transfer the control within 2kb of the memory. As we all know that all PIC microcontrollers do not come up with 2M of ROM. PIC18F4550 has only 32Kb of ROM available on chip so in order to be able not to waste the memory it is preferable to use BRA over GOTO.
Lab Manual 5
arithmetic instructions of PIC18F4550
Also read here
https://eevibes.com/pic16f4550-microcontroller/16-bit-timer-programming-of-pic18-microcontroller/