Interfacing DS18B20 Temperature Sensor with Raspberry Pi
In this article I have discussed about the Interfacing of DS18B20 Temperature Sensor with Raspberry Pi. For computation power and vast application in the field of IoT, Home Automation Raspberry pi is known. However, to interact or gets information for any electronic system, sensors are used. There are plenty of sensors which are used for this process to be measured. Accurate temperature is very crucial to control various applications in many applications’ measurement. In this project, we learn to interface a temperature sensor DS18B20 with the Raspberry Pi. At mine plants or chemical industries where, harsh operating environments are involved, the DS18B20 is widely used as temperature sensor.
Components required:
- DS18B20 Temperature Sensor
- Raspberry pi
- 16×2 LCD display
- 10k trim pot
- 10k pull up resistor
- Breadboard
- Connecting wires
Working:
The DS18B20 is a three terminal temperature sensor available in the TO-92 (transistor type) package. Only external component is required to start working and is very easy to use. Only one GPIO pin from the MCU/MPU is required to communicate with it. A waterproof version of sensor is also available which the sensor is covered by a cylindrical metal tube. like the Raspberry pi, the DS18B20 is a 1-wire programmable temperature sensor which requires only the data pin to send the information to microcontroller. Each sensor has a unique address of 64-bit for it so it is also possible to have multiple sensors connected to the same MCU/MPU since each sensor can be addressed individually on the same data bus. you’ll need to enable the One-Wire interface before the Pi can receive data from the sensor. The specification of the sensor is show below.
- Operating voltage: 3-5V
- Measuring Range: -55°C to +125°C
- Accuracy: ±0.5°C
- Resolution: 9-bit to 12-bit
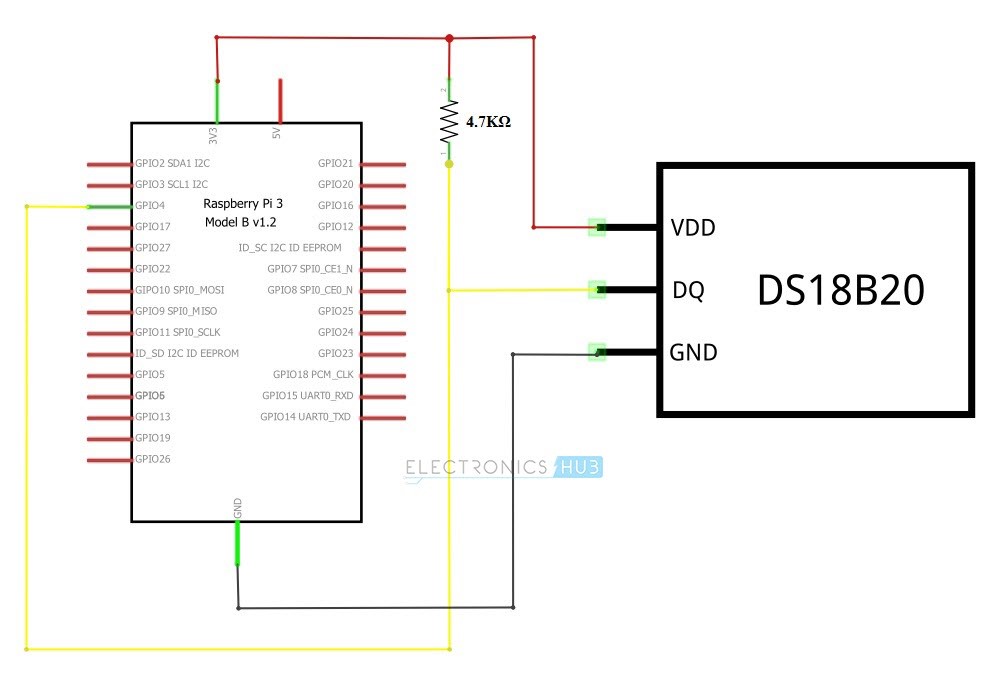
Circuit Diagram:
As we have told before we will interface the DS18B20 sensor with pi and display the value of temperature on a 16×LCD screen. So, the sensor and LCD should be connected with raspberry pi as follow:
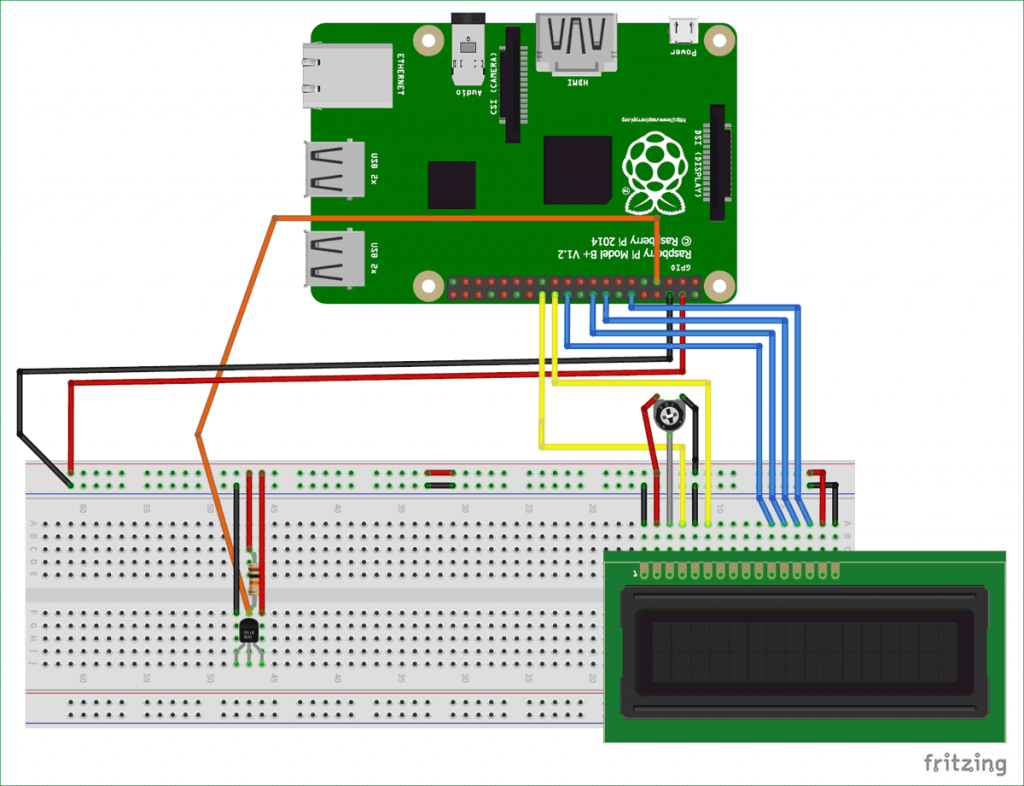
Make the connection accordingly using circuit diagram. A potentiometer is also used to control the contrast level of LCD. Both the LCD and the sensor works accordingly with the help of +5V which is provided by the 5V pin on raspberry pi. Built the circuit using the single strand wires and male to female wires on the breadboard to make the connections. As you can see it occupies less space and pins and require only one wire to interface. Now power up the pi and starts programming.
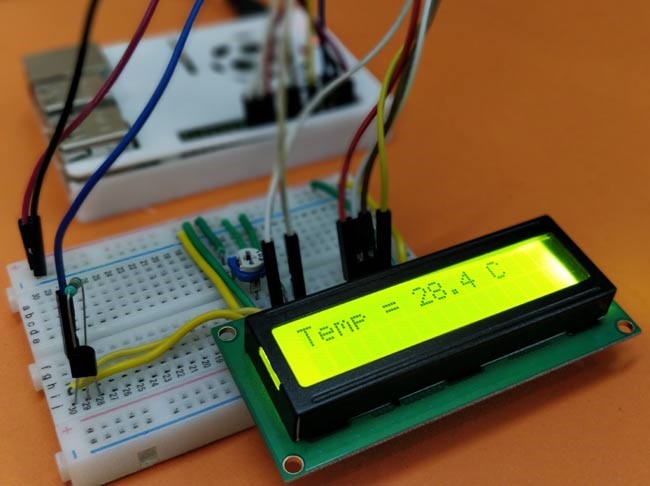
Output:
The python code is given below, use the code and compile it in Raspberry pi. Before executing the program make sure you have installed LCD header file and enabled one-wire communication on pi and make the connections as shown in circuit diagram. After executing the program if everything is looking the way you have expected, you should be able to see the intro text, otherwise adjust the contrast potentiometer until you saw something.
Code:
import os # import os module
import glob # import glob module
import time # import time module
os.system(‘modprobe w1-gpio’) # load one wire communication device kernel modules
Os.system(‘modprobe w1-therm’)
base_dir = ‘/sys/bus/w1/devices/’ # point to the address
device_folder = glob.glob(base_dir + ’28*’)[0] # find device with address starting from 28*
device_file = device_folder + ‘/w1_slave’ # store the details
def read_temp_raw():
f = open(device_file, ‘r’)
lines = f.readlines() # read the device details
f.close()
return lines
def read_temp():
lines = read_temp_raw()
while lines[0].strip()[-3:] != ‘YES’: # ignore first line
time.sleep(0.2)
lines = read_temp_raw()
equals_pos = lines[1].find(‘t= # find temperature in the details
if equals_pos != -1:
temp_string = lines[1][equals_pos+2:]
temp_c = float(temp_string) / 1000.0 # convert to Celsius
temp_f = temp_c * 9.0 / 5.0 + 32.0 # convert to Fahrenheit
return temp_c, temp_f
while True:
print(read_temp()) # Print temperature
time.sleep(1)
Applications:
Interface Temperature Sensor is one of the popular sensor modules used by hobbyists for implementing in a lot of IoT Projects. This sensor along with Raspberry Pi can also be used in:
- HVAC Systems
- Thermostats
- Home and Office Climate Control
- Weather Station
Conclusion:
Temperature sensor measures the amount of heat energy or even coldness generated by system allowing us to detect or ‘sense’ any physical change to that temperature producing either an analogue or digital output. They can be used to detect solids, liquids or gases over a wide range of temperatures. Temperature is read from the middle leg of temperature sensor which is Vout. So, from the above steps and code we can create a temperature sensor.
Also read here
https://eevibes.com/hardware-devices/raspberry-pi/what-is-the-raspberry-pi-model/