Introduction
You’re never on the computer with the bulky, unsightly printer when you want to print something. The Raspberry Pi is small enough that you can hide your printer just about anywhere and let the Pi do the work of being a print server.
You might think it would be nice to hide the bulky printer out of sight, but you’ll need to connect to it to actually print something. If you connect the printer to a discreet Pi running as a print server, you can connect to it from your primary computer remotely. You might even be able to find ways to mount the Pi on the back of the printer, or just tuck it away nearby. Either way, physically connect the printer cable to your Raspberry Pi, and let’s get started!
The easiest and most logical way to turn your Raspberry Pi into a print server is to set up CUPS (the Common UNIX Printing System). It’s another one of those things that’s often included in a Linux distribution, but probably not with your Raspberry Pi distri- bution. That’s what packages are for.
Install it on Pidora with the following command:
$ su -c ‘yum install cups’
Or install it on Raspbian:
$ su -c ‘apt-get install cups’
When you install CUPS, it creates a group called Lpadmin whose members CUPS will authenticate:
$ su -c ‘usermod -aG lpadmin user’
Replace user with the username that will be responsible for the printers. (Create one first if you prefer.)
Then you need to make a few changes to the CUPS configuration file in /etc/cups/ cupsd.conf. It never hurts to make a backup before you go editing such things:
$ cp /etc/cups/cupsd.conf /etc/cups/cupsd.conf.backup
Open the configuration file in a text editor and comment out the line under “Only listen for connections from the local machine” that says Listen localhost:631. Then add the following line under it:
Listen 192.168.0.122:631
Change the first part to your Pi’s IP address with :631 appended. (631 is the port that CUPS listens on.)Under “Restrict access to the server…”, add the following lines in bold, replacing the subnet with your own:
<Location />
Order allow, deny
Allow 192.168.0. Allow Localhost <Location>
Under “Restrict access to the admin pages…”, add the following lines in bold, replacing the subnet with your own:
<Location /admin>
Order allow, deny Allow 192.168.0.
Allow Localhost
<Location>
Under “Restrict access to configuration files…”, add the following lines in bold, replac- ing the subnet with your own:
<Location /admin/conf>
AuthType Default
Require user @SYSTEM
Order allow, deny
Allow 192.168.0.
Allow Localhost
<Location>
What is Firewalling?
Some Linux distributions come preconfigured with a iptables firewall for security. They do not usually have the CUPS ports (631 for TCP and UDP) open in the default configuration. Since you want to permit traffic to access the CUPS server through the firewall, you’ll need to punch a hole. For Pidora and Raspbian, you can add these lines into /etc/sysconfig/iptables:
-A INPUT -i eth0 -p tcp -m tcp –dport 631 -j ACCEPT
-A INPUT -i eth0 -p udp -m udp –dport 631 -j ACCEPT

Once you’ve made those edits, restart CUPS:
$ su -c ‘service cups restart’
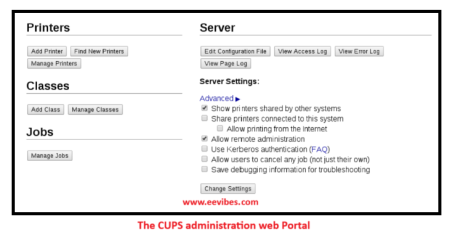
Then use a web browser to go to http://192.168.0.122:631, replacing the first part with your Pi’s IP address. (This can be on the Pi, your laptop, or any machine within the subnet.) Choose the Administration tab, and select Add Printer.
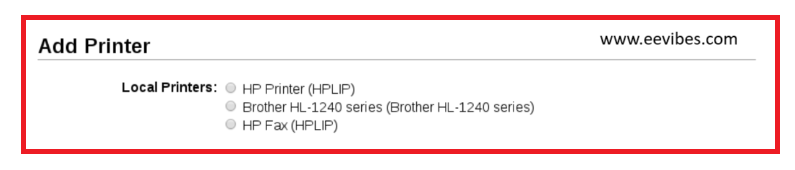
When you’re asked for a username and password, enter the information for the user you added to the lpadmin group. On the Add Printer page (Figure 3-4), choose your printer from the list under Local Printers.
You will be then asked to add or edit the name, location, and description of printer. For that, you need to enable “Share this printer”.
In the next step, you’ll be asked to choose the printer driver. You can scroll through the list until you find your printer (several are likely marked as “recommended”), or you can browse to a PPD file that you have from your printer’s manufacturer for the driver.
Finally, you’re offered the chance to set some generic print settings, like page size and source. When you’re finished setting your preferences, click Set Default Options, and you’ll be back to the main administration page for that printer.
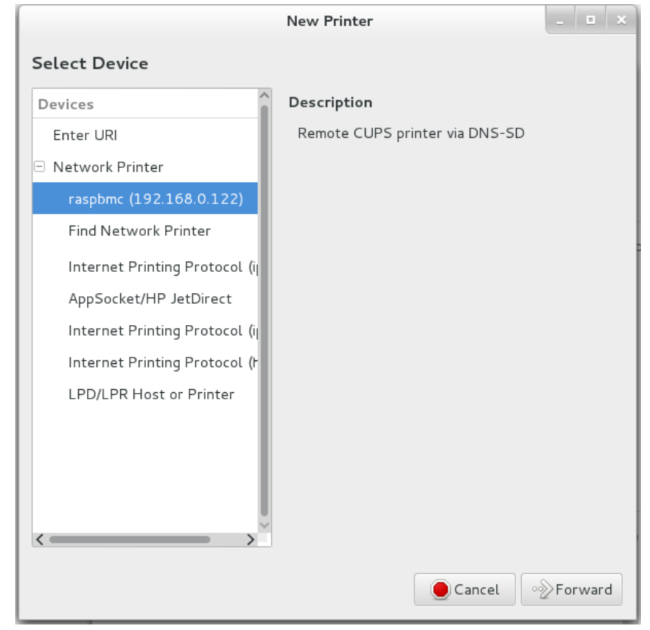
If you haven’t already, move to another machine on the network and get it ready to print. Use that particular computer’s printer settings system as shown in the following figure to add a printer and select the one that you’ve just set up.
So, this is all about setting up a printer!.