
Table of Contents
Smart Accident Prevention System using Internet of Things
In this article I have discussed about Smart Accident Prevention System using Internet of Things. Raspberry Pi is a single small computer board which was first developed in the United Kingdom by the Raspberry Pi foundation. In 2006, Atmel ATmega644 were the basis of early concepts of raspberry pi. Originally, it is leaned towards the computer science teaching promotion in developing countries and in schools.
The original pi model became more famous than anticipated. Due to its low cost and open design, it is used in wide range in many areas like weather monitoring. Because of adoption of USB and HDMI devices, it is used by computers and electronic hobbyists. The raspberry pi is one of the most selling British computers. It will act as a mini personal computer if we connect peripherals like keyboard, mouse, display to the raspberry pi. For robotics applications, IoT based applications and for real time image/video processing Raspberry Pi is used.
It is slower than laptop or desktop but is still a computer which at low power consumption provides all the expected abilities or features. It also provides access to the on-chip hardware i.e. GPIOs for developing an application. From 700 MHz to 1.2 GHz, the CPU speed of raspberry pi varies.
There are seven different versions of raspberry pi. It is a capable small device that allows people of all ages to explore computing, and to learn how to program in languages like c and python. Out of all models, raspberry pi 4 is the best with highest potential specifications for many general-purpose projects.
The power of computing and digital making is given by the foundation of raspberry pi into the hand of people all over the world. Smart Accident Prevention System using Internet of Things.
Architecture of Raspberry Pi 4 model B
In June 2019, the Raspberry Pi model 4 B was launched. It has three RAM options (2GB, 4GB, 8GB), integrated 802.11ac/n wireless LAN, gigabit Ethernet and Bluetooth 5.0 and uses a 1.5GHz 64-bit quad-core Arm Cortex-A72 CPU. It is the low-cost Raspberry Pi’s latest version. In cheapest form, it doesn’t have a case, and is simply a credit-card sized electronic board.
Pi 4 boards can be used as media centers, file servers, routers, retro games and network level ad-blockers for starters. In many projects people have used the pi model like to build tablets, laptop, phones, robot, smart mirrors. There are Raspberry Pi guides that show how to build all sorts of gadgets with the device.
Keep in mind it’s just a bare board, you’ll require a power supply, a monitor or TV, leads to connect the monitor, a micro-HDMI cable, mouse and keyboard. Using USB-C port, it can be powered allowing additional power to be provided to downstream peripherals.
Raspberry Pi 4’s specs
- Target price: its price is approximately $35/55/75
Instruction set:
SoC: Broadcom BCM2711
FPU:
CPU: 4×Cortex-A72 (1.5 GHz)
GPU: Broadcom video Core VI @500 GHz
Memory (SDRAM): 1,2,4 or 8 GB - USB 2.0 ports: 2
- USB 3.0 ports: 2
USB OTG ports: 1(Power USB-C)
PCIe interface: 0
Video input: 15-pin MIPI camera interface (CSI) connector, used with the Raspberry Pi camera or Raspberry pi NoIR camera
HDMI: 2×HDMI (rev 2.0) via micro-HDMI.
Composite video: via 3.5mm CTIA style TRRS jack
MIPI display interface: yes
Audio inputs: as a revision 2 boards
Audio outputs: analog via 3.5mm phone jack; digital via HDMI and, as of revision of 2 boards
On-board storage: MicroSDHC slot, USB Boot Mode
Ethernet (8P8C): 10/100/1000 Mbit/s
WIFI IEEE 802.11 wireless: b/g/n/ac dual band 2.4/5 GHz
Bluetooth: 5.0
Low level peripherals: 17×GPIO plus the same specific functions, HAT, and an additional 4×UART, 4×SPI, and 4×12C connectors.
Power ratings: 600 mA (3 W) average when idle, 1.25 A (6.25 W) maximum under stress (monitor, keyboard, mouse and Ethernet connected), 3 A (15 W) power supply recommended.
Power source: 5 V via USB-C or GPIO header
Size: 85.60 mm × 56.5 mm × 17 mm (3.370 in × 2.224 in × 0.669 in)
Weight: 46 g (1.6 oz)
Console: Adding a USB network interface via tethering or a serial cable with optional GPIO power connector
Generation: 4
Obsolescence statement: in production until at least January 2026
Type: model B
How to program Raspberry Pi
Best thing about working with python on the Raspberry pi is that python is a first-class citizen on the platform. Python is specifically selected by the Raspberry pi foundations as the main language because of its versatility, power and ease of use. Python is preinstalled on Raspbian when you get it, so you’ll be ready to start from the get-go. There are many different options for python writing on the Raspberry pi, we are going to discuss two popular:
Using the Mu editor
Editing remotely over SSH
Let’s start by discussing Mu editor to write python on the Raspberry pi
Using Mu Editor
Python IDEs are preinstalled on the operating system of Raspbian when it comes, that you can use to write your programs. Mu is one of these IDEs. It can be found in the main menu:
Raspberry Pi Icon —> Programming —> Mu
For the first time when you open Mu, you’ll be given the option to select the python mode for the editor. It is the possibility that python is not preinstalled on your version of Raspberry, then you can install it using following file location:
Raspberry Pi Icon —> Preferences —> Recommended Software
To start with python on Raspberry pi, Mu provides a great editor.
Editing Remotely over SSH
Mostly, you won’t want to spend your time over connecting monitor, keyboard and mouse to write python. Fortunately, Raspbian allows you to remotely connect Raspberry pi over SSH. Now we’ll learn how to enable SSH.
Enable SSH
You’ll need to enable SSH access inside the Raspberry Pi Preference area, before you connect to Raspberry pi over SSH. Enable SSH through following file location:
Raspberry Pi Icon —> Preferences —> Raspberry Pi Configuration
After enabling SSH on Raspberry pi determine the Raspberry pi address then connect to the Raspberry pi.
Physical(electronic) components
Breadboard
Jumper wires
Light –emitting diodes (LEDs)
Tactile button
330 Ω resistor
Active piezo buzzer
Passive infrared motion sensor
Design a smart Accident Prevention System using Internet of Things
The following project is concerned with the speed of the vehicle using a transmitter and receiver with the integration of accident prevention and alcohol consumption detection. Road accidents are increasing in our day to day lives. Most of the accidents occur due to over-speeding, drunken driving and careless driving. Though we cannot stop accidents, we can reduce the accidents by taking necessary safety measures. Therefore, there must be a smart accident avoiding system that includes automatic speed control at restricted areas, alcohol consumption detection and the vehicle’s distance from other vehicles on the road to prevent accidents.
Components Used
MQ3 Gas Sensor
GPS receiver module
Mg2639 GSM module
Ultra-sonic sensor
Node MCU
Working
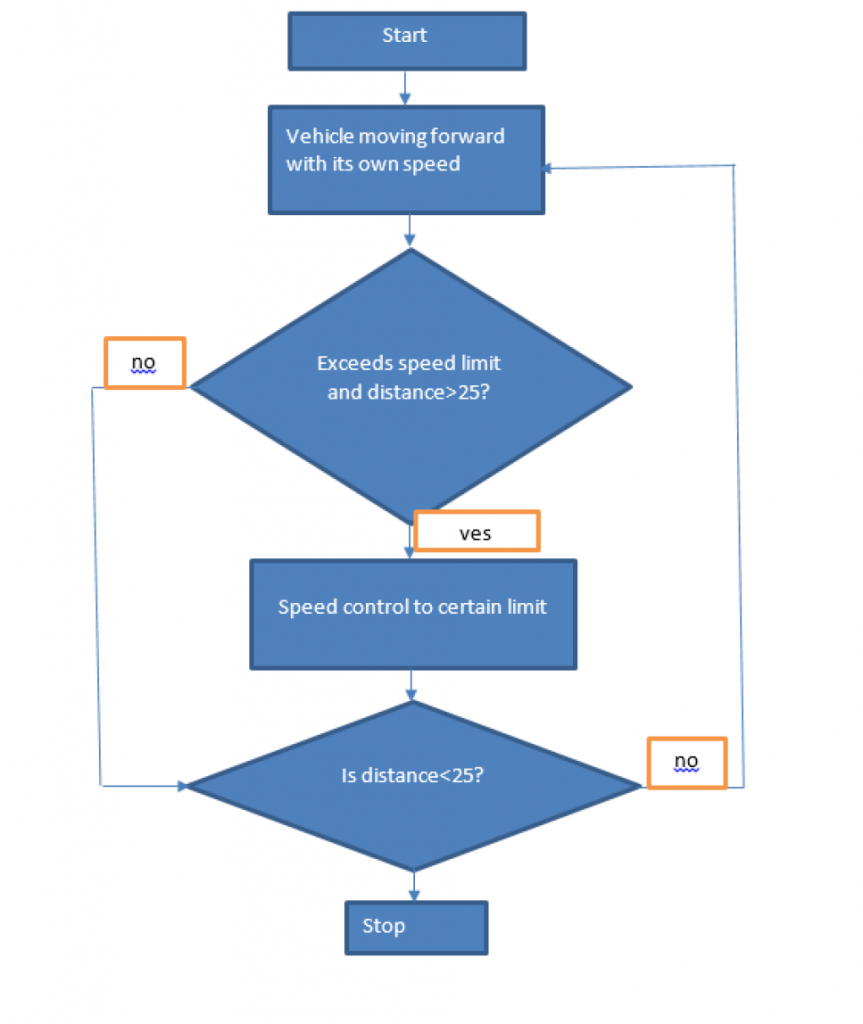
The RF transmitting circuit consists of a RF transmitter module. When the RF transmitter is turned on, the data set by the user is encoded and sent to the Receiver module. The receiver module decodes the data. If the speed of the vehicle is less than the limit zone, then no action is taken and the speed of the vehicle remains the same. If the speed exceeds the set speed limit, then the speed limit is set according to the zone.
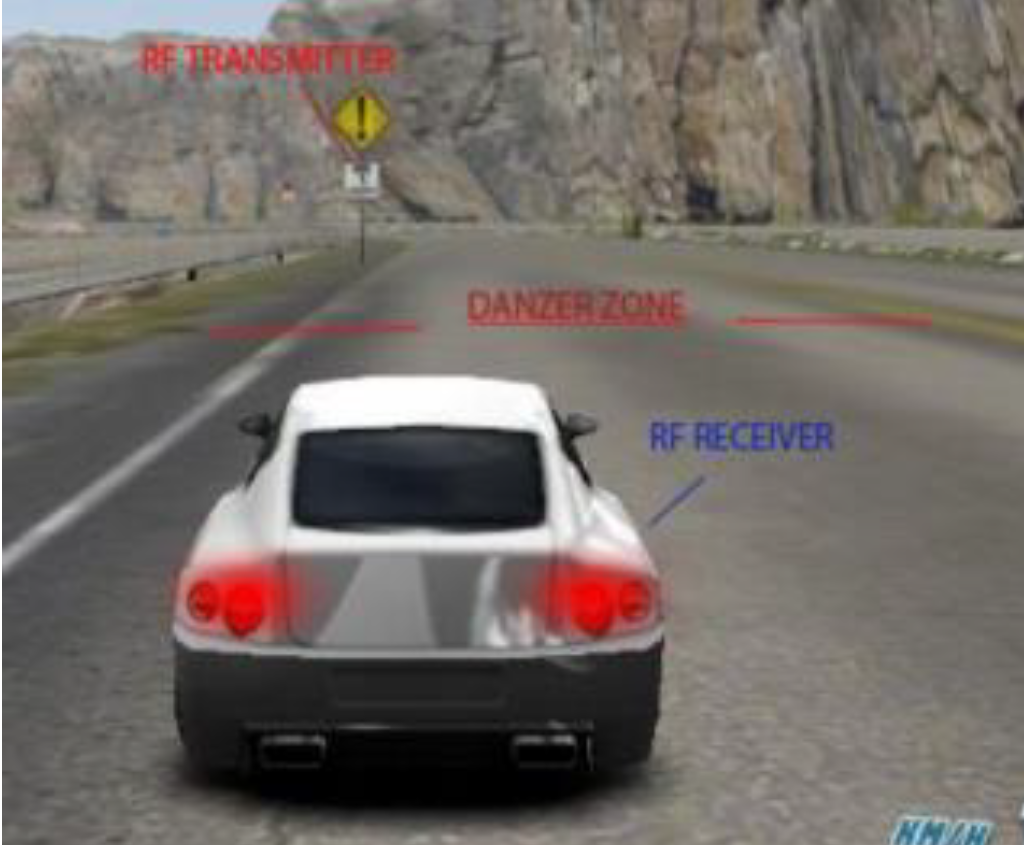
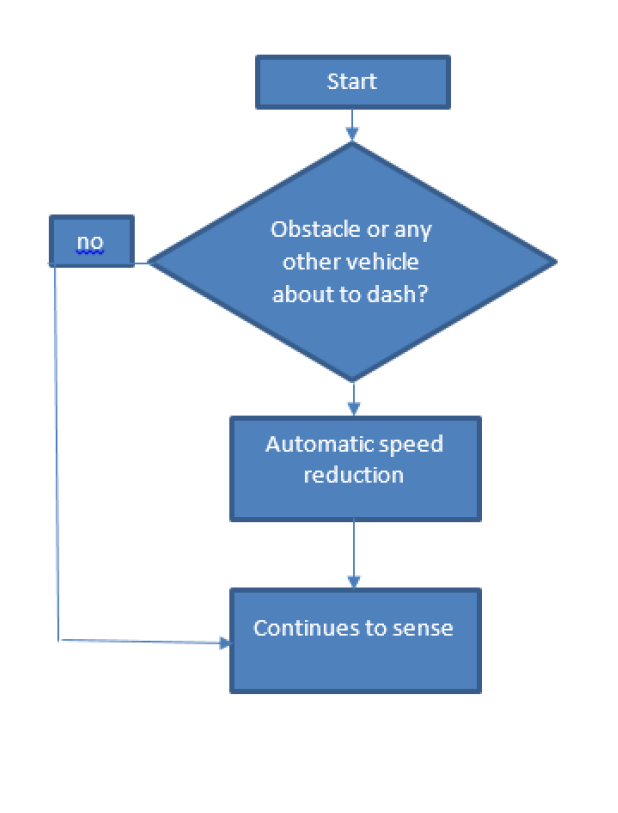
Ultrasonic sensors transmit ultrasonic waves from its sensor head and again receives the ultrasonic waves reflected from an object. By measuring the length of time from the transmission to reception of the sonic wave, it detects the position of the object. In case of any accident about to happen by dashing on any obstacle or any other vehicle, the ultrasonic sensor detects it and automatically reduces the velocity of the car.

The alcohol sensor being used will detect the alcohol consumption through the breath of the driver and will notify police about the driver’s condition along with location.
Code: const int trigPin = D1; //D4
const int echoPin = D2; //D3
const int trigPin1 = D6; //D4
const int echoPin1 = D8; //D3
int buzzer = 10;
long duration;
int distance;
long duration1;
int distance1;
typedef struct test_struct {
String VehicleNo;
} test_
test_struct myData;
void OnDataRecv(uint8_t * mac, uint8_t *incomingData, uint8_t len) {
memcpy(&myData, incomingData, sizeof (
Serial print ((“Bytes received:
Serial println (
Serial println (myData.
Serial println
void setup ()
Serial pr intln (buzzer, OUTPUT
pinMode (trigPin, OUTPUT ); // Sets the trigPin as an Output
pinMode (echoPin, INPUT ); // Sets the echoPin as an Input
pinMode (trigPin1, OUTPUT ); // Sets the trigPin as an Output
pinMode (echoPin1, INPUT ); // Sets the echoPin as an Input
display begin (SSD1306_
display .
Serial begin (
delay (
if (esp_now_init() != 0)
Serial println ((“Error initializing ESP NOW”
return
esp_now_set_self_role(ESP_NOW_ROLE_SLAVE);
esp_now_register_recv_cb(OnDataRecv);
void loop ()
int distance;
display setCursor (30, 0); //oled display
display setTextSize (
display .setTextColor(
display println ((“SPEED
display setCursor (10, 20); //oled display
displa y setTextSize (
display .setTextColor(
display println (distance_
display setCursor (90,
display setTextSize (
display println ((”
display setCursor (10, 45); //oled display
display setTextSize (
display .setTextColor (
display println (distance_
display setCursor (90,
display setTextSize (
display println ((”
display display
delay (
display .
Serial println (distance_
Serial println (distance_
digitalWrite (trigPin1, LOW );
digitalWrite (trigPin1, HIGH
delayMicroseconds (
digitalWrite (trigPin1, LOW
duration1 = pulseIn (echoPin1, HIGH
distance_cm1 = (duration1 / 2) / 29.1;
distance_in1 = (duration1 / 2) / 73.914;
display .set TextColor(WHITE);
display println (distance_
display setCursor (90,
display setTextSize (
display println ((”
display setCursor (10, 45); //oled display
display setTextSize (
display .setTextColor(
display println (distan ce_in1);
display setCursor (90,
display setTextSize (
display println ((”
display display
delay (
display .
Serial println (distance_
Serial println (distance_
display println (myData.
if (distance_cm <=
digitalWrite (buzzer, HIGH
delay (
else
digitalWrite (buzzer, LOW
delay )
Also read here
https://eevibes.com/hardware-devices/raspberry-pi/interfacing-of-hall-sensor-with-raspberry-pi/