Table of Contents
Design of a Buzzer alarm with Raspberry Pi
In this article I have discussed about the design of a buzzer alarm with Raspberry Pi. The active buzzer uses an internal oscillator to create a tone. This means that you only need a DC voltage to create stable sound. like capacitors they have unequal legs the positive leg might be longer than the negative one or the positive sign will be mentioned on it. The long pin indicates the good end of the buzzer. In addition, the active buzzers are prepared with coated bottoms to protect their inner circuits from fine dust and a short rope that has formed.
Active buzzer
For our example, we will use an active buzzer as a sound warning when the thermistor reading is above a certain temperature.
The things we need are:
Raspberry Pi
Bread board
Jumping wires
DHT Heat Sensor
Active Buzzer
Procedure for hardware
Let’s move on and hold the call with buzzer:
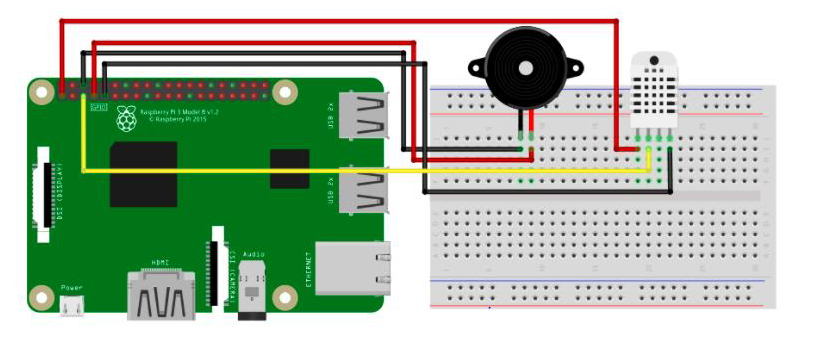
• Place the buzzer on the bread board, and note the placement of the good leg of the buzzer.
• Connect the female and male jumper wire from the Raspberry Pi’s GND pin to the hole in the single breadboard line as the negative buzzer leg.
- Connect the female-to-male jumper wire from the Raspberry Pi’s GPIO4 pin to the hole in the breadboard line parallel to the fine bass leg
We will use the Adafruit DHT Python library to connect our DHT sensor to the Raspberry Pi. There’s no need to install software We can easily install adafruit DHT with online
Sudo pip3 includes Adafruit_DHT
Procedure for Programming
We only need two python libraries for this project – first, the Adafruit_DHT library to connect the nerve and the RPi.GPIO library to start the buzzer. initially, we indicate the actual DHT sensor. Next, set the pin numbers for both the sensor and the buzzer. I prefer to set a GPIO pin with numbers on BCM. Finally. we set the Buzzer pin as an output with the original LOW feature.
The main loop reads the temperature and humidity from the sensor. If the temperature exceeds 32 degrees Celsius, Pi will send a HIGH signal to activate the active buzz
Code for active buzzer
import Adafruit_DHT as AdaDHT
import RPi.GPIO as GPIO
DHTSensor = AdaDHT.DHT11
GPIO.setwarnings(False)
GPIO.setmode(GPIO.BCM)
GPIO.setup(BuzzerPin, GPIO.OUT, initial=GPIO.LOW)
while True:
humidity, temperature = AdaDHT.read_retry (DHTSensor, DHTPin)
if humidity is not None and temperature is not None:
print(“Temperature={0:0.1f}*C Humidity={1:0.1f}%”.format(temperature, humidity))
if(temperature>32):
GPIO.output(DHTPin, GPIO.HIGH)
else:
GPIO.output(DHTPin, GPIO.LOW)
else:
print(“Failed to retrieve data from sensor”)
Conclusion
The Raspberry Pi is an amazing computer tool that keeps getting better. It is packed with features that make it a computer program. It is a tiny beast which creates amazing projects on embedded systems in low cost. Python is a perfect complement to the Raspberry Pi, and with raspberry PI you can tackle cool and new computer projects.
Also read here for more projects