Table of Contents
Briefly write about all pins of LCD for connecting with the PIC microcontroller
Briefly write about all pins of LCD for connecting with the PIC microcontroller. In this article, you’ll learn to interface associate liquid crystal display with a pic microcontroller. it’s terribly straightforward and simple to know the project for beginners and is often employed in many electronic merchandise. liquid crystal display (Liquid Crystal Display)provides a easy interface and may be terribly helpful for debugging functions. when completion of this tutorial, you’ll be able to show information on associate liquid crystal display victimization MPLAB XC8 Compiler and Mikro compiler. we are going to offer examples with 2 Compilers like MPLAB XC8 Compiler and Mikro C for PIC.
The reason liquid crystal display is additional widespread than light-emitting diode, Seven section displays. as a result of we will show characters, numbers and custom characters with ease ( simply by simply programming a module).
If you only started with pic microcontrollers programming, you’ll scan these urged readings:
First of all, to interface digital display with a pic microcontroller, we have a tendency to used GPIO pins. GPIO pins square measure all-purpose input-output pins. as a result of we have a tendency to send management and knowledge signals to digital display through these I/O pins. Therefore, you ought to acumen to use digital input-output pins of the pic microcontroller. to understand concerning GPIO pins programming, check these tutorials:
Now let’s initial perceive the pinout diagram and commands of 16×2 liquid show.
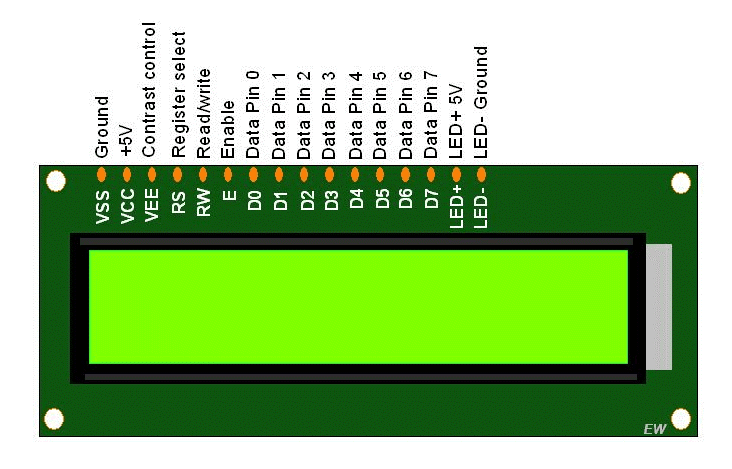
Pin Number Name Use:
1 Vss Ground
2 Vdd Power
3 Vee To regulate the distinction
4 RS 1=Data input
0= Instruction input
5 R/W 1=Read from digital display
0= Write to digital display
6 9Enable (EN) From one to zero = knowledge is written to the digital display
7 DB0 Data Bus Lines
8 DB1
9 DB2
10 DB3
11 DB4
12 DB5
13 DB6
14 DB7
15 LED+ Backlight
16 LED-
Character show chart
How to interface/Connect digital display with PIC Microcontroller
It will add 2 modes, 4-bit and 8-bit. during this tutorial, we’ve got used the four-bit mode that uses solely 4 knowledge lines, so saving pins of the microcontroller. thus it’s counseled to use digital display in four bits mode to save lots of pins of the microcontroller for different applications.
As you’ll see during this diagram, if we have a tendency to use 8-bit mode interfacing, we are going to got to use eleven pins of pic microcontroller. On the opposite hand, if we have a tendency to use 4-bit mode, we’d like solely vi GPIO pins. Therefore, it’s counseled to use 4-bit mode interfacing. the sole distinction between 4-bit and 8-bit is that knowledge transfer speed is quicker for 8-bit mode. However, it doesn’t create any major distinction.
A rheostat is employed to regulate the distinction of 5×8 dot pixels in line with background lightweight. Therefore, if you’re ineffectual to check something on digital display when programming, the utmost changes square measure that you just got to regulate distinction with the rheostat. This distinction register makes fits the voltage applied on the VEE pin.
PIC Microcontroller digital display Interfacing Programming
In this tutorial, we are going to use 2 pic microcontroller compilers for programming:
MPLAB XC8 Compiler
MikroC professional For PIC
For MPLAB XC8 Compiler, we are going to use the PIC18F4550 microcontroller. For MikroC professional for PIC, we are going to use the PIC16F877A microcontroller. within the case of MPLAB XC8, we are going to develop our own digital display library. as a result of the XC8 compiler doesn’t give integral libraries. within the contrary, MikroC professional provides libraries for all modules like digital display, Keypad, ADC Module, UART module.
LCD Interfacing Programming MPLAB XC8 Compiler
In this section, we are going to see a way to write example code for 16×2 digital display interfacing with PIC18F4550 microcontroller. Although, you’ll use see code with different Pic microcontrollers additionally.
As we have a tendency to mentioned earlier, we are able to use the 8-bit mode and 4-bit mode interfacing. however thanks to the economical use of MCU pins, we are going to be victimisation 4-bit Mode. To interface digital display, we have a tendency to follow these steps:
Define PIC18F4450 pin that we would like to use for causing commands and knowledge to digital display
After that send configuration commands to pick out mode and different configuration settings
Once we’ve got with success designed digital display, we are able to transmit knowledge to digital display.
Interfacing Circuit. Make the connections of 16X2 digital display with PIC18F4550 microcontroller in line with this circuit diagram.
In this circuit, we have a tendency to used the PORTB of PIC18F4550. however you’ll use any PORT. To do this, we’d like to alter the pin assignment within the code. i will be able to show you the way to assign pins for digital display within the next section.
LCD Interfacing with Pic microcontroller pic18f4550
It consists of fourteen pins. There square measure eight knowledge pins from D0-D7 and 3 management pins like RS, RW, and E. diode+ and LED- pins square measure accustomed management the backlight LED.
Also read here
https://eevibes.com/computing/introduction-to-computing/interrupt-priority-of-pic18-microcontroller/