How to design an LED Flasher on Arduino Board
How to design an LED Flasher on Arduino Board. An LED flasher is a simple circuit that is used for blinking the LED for a specific interval of time. That time can be set using the built-in function delay form Arduino library. Its a very simple project for all those who are starting to learn Arduino. The hardware components required for this project are:
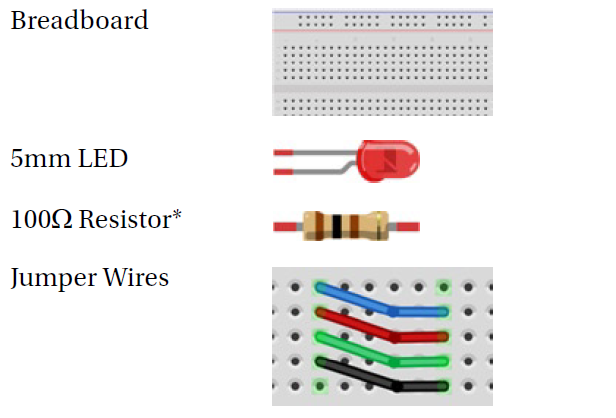
- Breadboard
- Resistor
- LED
- Jumper wires
Hardware overview
Breadboards with 840 tie point are better for designing such projects. They are of standard size and measured as 16.5cm X 5.5cm thus having 840 holes. LED of 5mm of any color can be used. The value of the resistor is determined by the amount of current and voltages needed for LED. The jumper wires which have molded ends can be used.
Connect them up
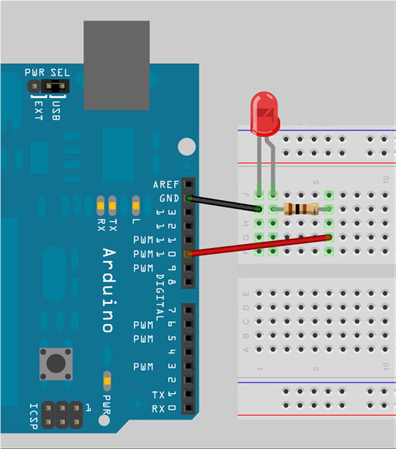
First of all, make sure your Arduino is powered off by unplugging from USB cable. Then connect all components on board as shown in the above figure. While making connections, make sure each component is inserted in breadboard holes properly. Otherwise, it may cause the failure of circuit. Also LED should be connected correctly. The correct connection means that anode of LED should be connected with the positive terminal of the battery. While cathode should be connected with the negative terminal of the battery. In simple words LED should be forward biased. When everything is connected properly Arduino board can be powered up.
Arduino code for Flashing LED
int ledPin = 10;
void setup() {
pinMode(ledPin, OUTPUT);
}
void loop() {
digitalWrite(ledPin, HIGH);
delay(1200);
digitalWrite(ledPin, LOW);
delay(1200);
}
After writing down this code press ‘verify’ button at the top of IDE to check there are no errors in the code. If your code does not show any error message you can upload it in Arduino. Now plug in the Arduino and you can see how LED flashes after a specific time.
Code overview
Here we are using pin 10 for connecting LED. This pin will act as a variable whose value will toggle between 0 and 1. The next two functions are void setup() and void loop. Any Arduino program must have these two functions otherwise it will not work. The setup() function runs only once. It sets modes of pins (input or output), sets baud rate etc. This function makes pin 10 as output pin using pinMode function.The second function is void loop(). As it is clear that it will not return any value that’s why it has used void in the beginning. Parenthesis are also not taking any arguments so it will merely repeat the set of statements continuously. The digitalWrite function sets pin high for almost 1200 milliseconds. Then the pin status is changed to low for 1200 milliseconds again and this continues until the Arduino remains powered up.
Lec1 :Introduction to Arduino: Starting from Scratch
Lec 2:LED Program Blinking Program with Arduino
Also read here
https://eevibes.com/which-arduino-to-buy/
Buy Arduino form here
One thought on “How to Design an LED Flasher on Arduino Board?”