Introduction
Creating an UP counter with a seven-segment display and PIC microcontroller involves both hardware and software components. Here’s a breakdown:
Hardware:
- PIC Microcontroller: Choose a PIC model with enough I/O pins for your display (common cathode or common anode) and a timer/counter module. Popular choices include PIC16F84A, PIC16F877A.
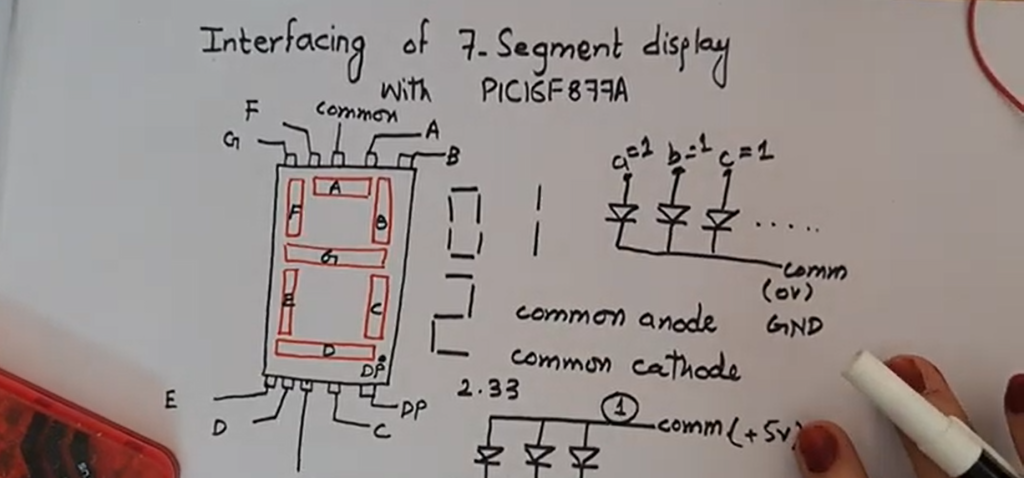
- Seven Segment Display: Select a single-digit or multi-digit display based on your counting range. You’ll need current limiting resistors for each segment.
- Programming tools: A PIC programmer and development environment like MPLAB or Mikro C Pro for PIC. Here I have used Mikro C Pro for PIC.
Software:
- Pin configuration: Set the I/O pins of PORTB connected to the display segments and the common electrode (cathode) as outputs using the PIC’s registers. You can opt any of the techniques for designing a counter. Right now I have used a simple for loop for designing counter which will count from 0 to 9. Another approach is to use the timer with interrupts that is discussed below.
- Timer/counter setup: Configure a timer/counter module in the PIC to generate interrupts at a specific frequency. This frequency will determine the counting speed.
- Interrupt Service Routine (ISR): Write an ISR that gets triggered by the timer overflow interrupt. Inside the ISR, increment a counter variable.
- Display Logic: Implement a function that takes the counter value and converts it to the corresponding 7-segment code (lighting patterns) for each digit. You can use a lookup table for this conversion.
- Outputting to Display: In the main loop or ISR, update the port pins connected to the display segments based on the 7-segment code obtained from the counter value.
Here are some additional resources to help you get started:
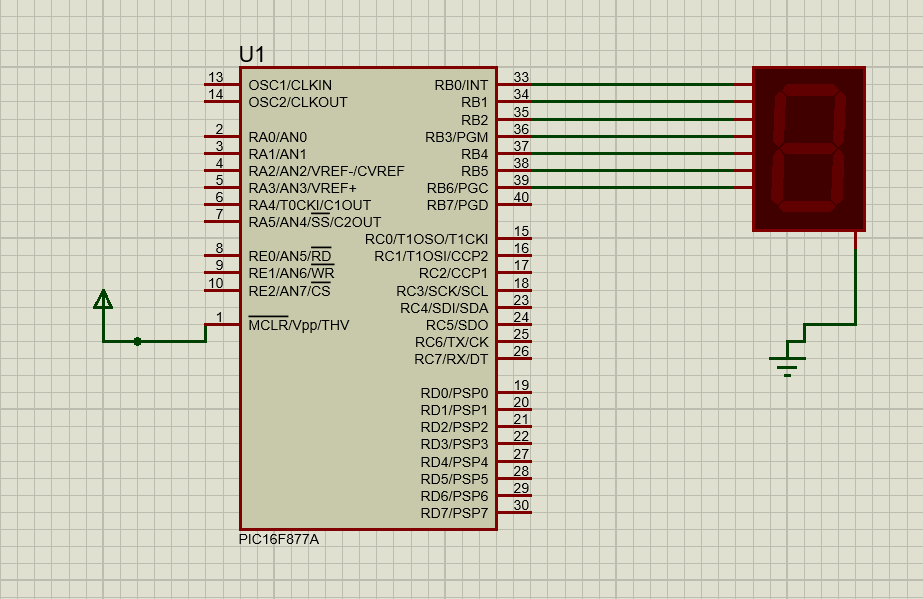
- Circuit Diagram: Here is the circuit that I have used for implementing this problem.
C code for Interfacing 7-Segment Display with PIC16F877A Microcontroller.
- Here is the code for interfacing 7 segment display with PIC microcontroller. This code works for a single digit display.
void main() {
int kp=0,i;
trisb=0;
while(1){
for (i=0;i<=9;i++)
{if (i==0)
{
kp= 0b10111111;
}
if (i==1)
{
kp= 0b10000110;
}
if (i==2)
{
kp= 0b11011011;
}
if (i==3)
{
kp= 0b11001111;
}
if (i==4)
{
kp= 0b11100110;
}
if (i==5)
{
kp= 0b11101101;
}
if (i==6)
{
kp= 0b11111101;
}
if (i==7)
{
kp= 0b00000111;
}
if (i==8)
{
kp= 0b11111111;
}
if (i==9)
{
kp= 0b11100111;
}
portb=kp;
delay_ms(300);
kp++;
}
kp=0;
}
}
Tips:
- Start with a single-digit counter and expand to multi-digit displays once comfortable.
- Use comments in your code to explain each section for better understanding.
- Simulate your circuit and code in a development environment before implementing on hardware.
By following these steps and exploring the provided resources, you can build your own PIC-based UP counter with a seven-segment display!
Step by Step explanation of Interfacing of Seven Segment Display with PIC Microcontroller