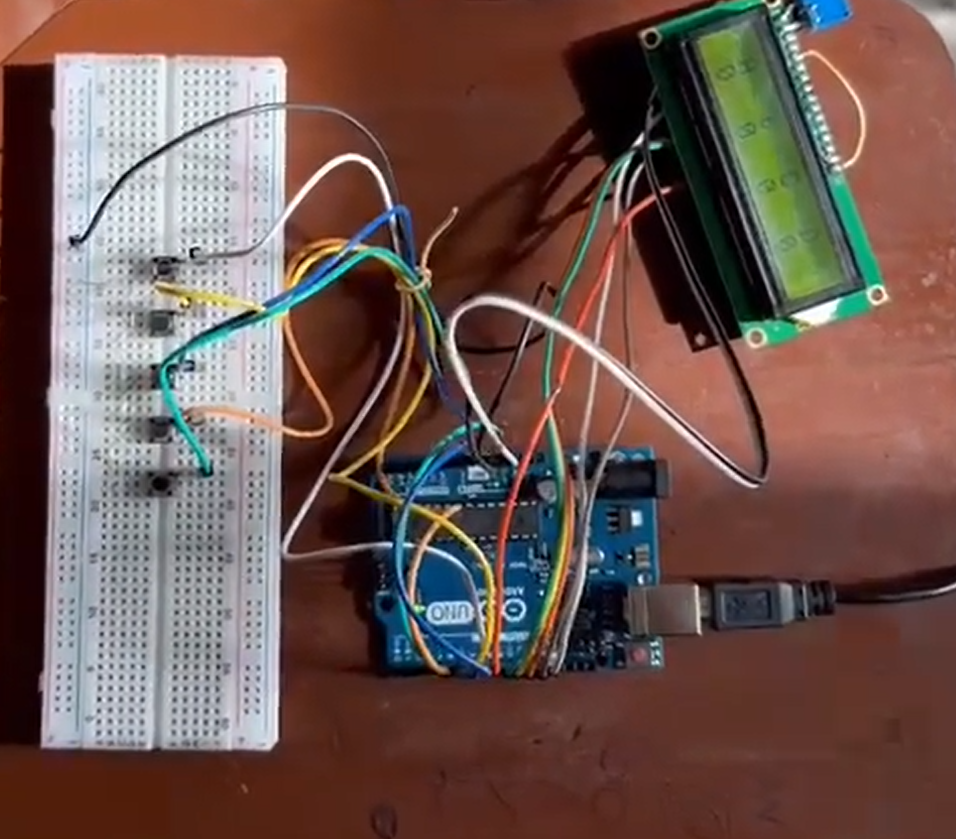
Objective of the project
Design of smart electronic voting machine using Arduino. The main goal of this project is to develop an electronic voting machine that will aid in the elimination of fraud in manual voting systems and previous electronic voting versions.
The system comes with a n number of switches, where n represents the number of political parties. The voter will be able to select their chosen candidate from a panel of buttons at this point. The final vote is then shown on an LCD to ensure voter satisfaction. Finally, the result can be calculated automatically by pressing the result button.
Components:
- Arduino UNO
- LCD display
- Potentiometer
- Push button
- Connecting wires
- Breadboard
Description:
Arduino UNO:
It is a microcontroller board based on the ATmega328P. It has 14 digital input/output pins (of which 6 can be used as PWM outputs), 6 analog inputs, a USB connection, a power jack, an ICSP header and a reset button. It contains everything needed to support the microcontroller.
Block diagram:
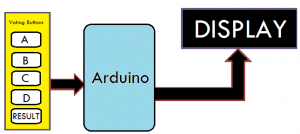
We used four push button for four distinct candidates in the election, all of whom are using Arduino. We can expand the number of candidates if necessary. Each time a voter presses one of the four buttons, the voting value is increased by one. The result button can be pushed after the entire voting process to display the outcome.
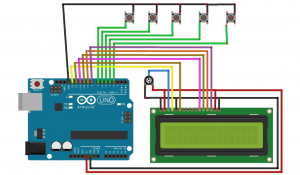
Circuit Diagram:
Assemble the circuit as depicted in the diagram. Connect the 5 push buttons to Arduino’s digital pins 7,6,5,4,3. Connect pins 4, 6, 11, 12, 13, 14 of the LCD to digital pins 13, 12, 11, 10, 9, 8 of the Arduino in the same way.
Working:
In this case, Arduino serves as the system’s heart and brain. The Arduino controls the entire voting process, including reading the button, incrementing the vote value, generating a result, and sending the vote and result to the LCD display.
Here, we’ve added five buttons: one for team A, one for team B, one for team C, one for team D, and one for calculating or displaying results.
Program ;
Code:#include<LiquidCrystal.h>
LiquidCrystal lcd(13, 12, 11, 10, 9, 8);
#define S1 7
#define S2 6
#define S3 5
#define S4 4
#define S5 3
int vote1=0;
int vote2=0;
int vote3=0;
int vote4=0;
void setup()
{
pinMode(S1, INPUT);
pinMode(S2,INPUT);
pinMode(S3,INPUT);
pinMode(S4,INPUT);
pinMode(S5,INPUT);
lcd.begin(16, 2);
lcd.print(” Electronic “);
lcd.setCursor(0,1);
lcd.print(” Voting Machine “);
delay(4000);
digitalWrite(S1, HIGH);
digitalWrite(S2, HIGH);
digitalWrite(S3, HIGH);
digitalWrite(S4, HIGH);
digitalWrite(S5, HIGH);
lcd.clear();
lcd.setCursor(1,0);
lcd.print(“A”);
lcd.setCursor(5,0);
lcd.print(“B”);
lcd.setCursor(9,0);
lcd.print(“C”);
lcd.setCursor(13,0);
lcd.print(“D”);
}
void loop()
{
lcd.setCursor(1,0);
lcd.print(“A”);
lcd.setCursor(1,1);
lcd.print(vote1);
lcd.setCursor(5,0);
lcd.print(“B”);
lcd.setCursor(5,1);
lcd.print(vote2);
lcd.setCursor(9,0);
lcd.print(“C”);
lcd.setCursor(9,1);
lcd.print(vote3);
lcd.setCursor(13,0);
lcd.print(“D”);
lcd.setCursor(13,1);
lcd.print(vote4);
if(digitalRead(S1)==0)
vote1++;
while(digitalRead(S1)==0);
if(digitalRead(S2)==0)
vote2++;
while(digitalRead(S2)==0);
if(digitalRead(S3)==0)
vote3++;
while(digitalRead(S3)==0);
if(digitalRead(S4)==0)
vote4++;
while(digitalRead(S4)==0);
if(digitalRead(S5)==0)
{
int vote=vote1+vote2+vote3+vote4;
if(vote)
{
if((vote1 > vote2 && vote1 > vote3 && vote1 > vote4))
{
lcd.clear();
lcd.print(“A is Winner”);
delay(3000);
lcd.clear();
}
else if((vote2 > vote1 && vote2 > vote3 && vote2 > vote4))
{
lcd.clear();
lcd.print(“B is Winner”);
delay(3000);
lcd.clear();
}
else if((vote3 > vote1 && vote3 > vote2 && vote3 > vote4))
{
lcd.clear();
lcd.print(“C is Winner”);
delay(3000);
lcd.clear();
}
else if(vote4 > vote1 && vote4 > vote2 && vote4 > vote3)
{
lcd.setCursor(0,0);
lcd.clear();
lcd.print(“D is Winner”);
delay(3000);
lcd.clear();
}
else if(vote4 > vote1 && vote4 > vote2 && vote4 > vote3)
{
lcd.setCursor(0,0);
lcd.clear();
lcd.print(“D is Winner”);
delay(3000);
lcd.clear();
}
else
{
lcd.clear();
lcd.print(” Tie Up Or “);
lcd.setCursor(0,1);
lcd.print(” No Result “);
delay(3000);
lcd.clear();
}
}
else
{
lcd.clear();
lcd.print(“No Voting….”);
delay(3000);
lcd.clear();
}
vote1=0;vote2=0;vote3=0;vote4=0,vote=0;
lcd.clear();
}
}
}
Conclusion:
So we used a new technology of Arduino to create a machine for voting. This advanced technology is making more opportunities of evolution in electrical fields.
Video for Design of smart electronic voting machine using Arduino
https://www.youtube.com/watch?v=QVfX-pZKhig
Arduino Projects:
- How to Display on 8×8 Dot Matrix LED Using Arduino(UNO)?
- How to Design RGB Mood Lamp using Arduino?
- Serial Temperature Sensor Project using Arduino
- How to design an LED Flasher on Arduino Board
- Design of Traffic Light Control system using Arduino
- Arduino Project: How to control the speed of DC motor?
- Arduino Project: Send Command with Serial Communication
- Arduino Project: LED Fire Effect
- How to control the speed and direction of DC motor using Arduino?